
Connect your own tools in the Studio, step by step (no code)
A plain walk from your first connector to a live, tested answer: connector, capability, rules, assistant settings, test and publish. Real Studio screens.
This guide is for the person who owns the business and has never done this before. You do not need to write code. You do need to know a few words, so each one is explained the first time it shows up.
Every screenshot below is from the Studio of Kav's own organization, on a test copy, so nothing here belongs to a customer. Example data. Illustrative.
The big picture in five lines
- A person asks your assistant a question, on your website or another channel.
- The assistant does not touch your systems. It picks a capability, which is a small, named job such as "look up a booking".
- The capability uses a connector, which is the phone line to your tool.
- Your tool answers. The answer comes back as data, and a template turns that data into the sentence the person reads.
- Three rules never bend. Nothing above the capability layer calls your system directly. Who the person is comes from their sign-in, never from what they type in the chat. And the assistant never writes a number itself: money, dates and ids come from your data.
Think of a restaurant. The assistant is the waiter. The capability is one item on the order slip ("table for two at 7"). The connector is the phone line to the kitchen. Your tool is the kitchen. Rules are the house policy the waiter checks before promising anything ("no bookings after 10"). The waiter never walks into the kitchen.
Who does which step
Different people hold different keys in the Studio, on purpose. Here is what we saw in the Studio itself.
| Step | Who can do it |
|---|---|
| Create a connector, switch it on, bind a capability to it | An integration engineer or a city administrator |
| Store the password or key for a connector | The city administrator only. Not the integration engineer |
| Write a rule as a draft | An integration engineer or a city administrator |
| Publish a rule | The city administrator |
| Assistant model, answer policy, spend ceiling | The city administrator (organization settings) |
| Declare a brand new capability, or change what one means | The Kav team (platform operator) |
| Write a connector definition for a new kind of system | The Kav team |
If a button is greyed out, the Studio says which permission is missing, in words. Pass that line to whoever manages roles in your organization.
Step 1. The connector: the phone line to your tool
A connector is the saved connection to one of your systems: where it lives (the address) and how to log in (a credential). A connector instance is your own copy of it.
Before you start, know three things: the name you want to give it, the web address of your tool's API, and who will store the password.
- Open Connectors in the left menu, then press New instance. The wizard opens.
- Step 1 of 3, choose a connector. The list shows every kind of system the platform already knows how to talk to. Pick the one that matches your tool.
- Step 2 of 3, connection details. Fill in the three boxes shown below.
- Instance slug. A short name with lowercase letters, digits and hyphens, for example
example-bookings-tool. It never changes, so choose well. - Base URL. The address of your tool's API. It must start with
http://orhttps://. This is the one place a typo reaches a real network address, so it is checked three times. - Vault key. This is only the name of the place where the password will be kept. It is not the password. There is no box anywhere in the Studio where you type a password into a connector form.
- Instance slug. A short name with lowercase letters, digits and hyphens, for example
- Step 3 of 3, review. Read it once, then create the instance.
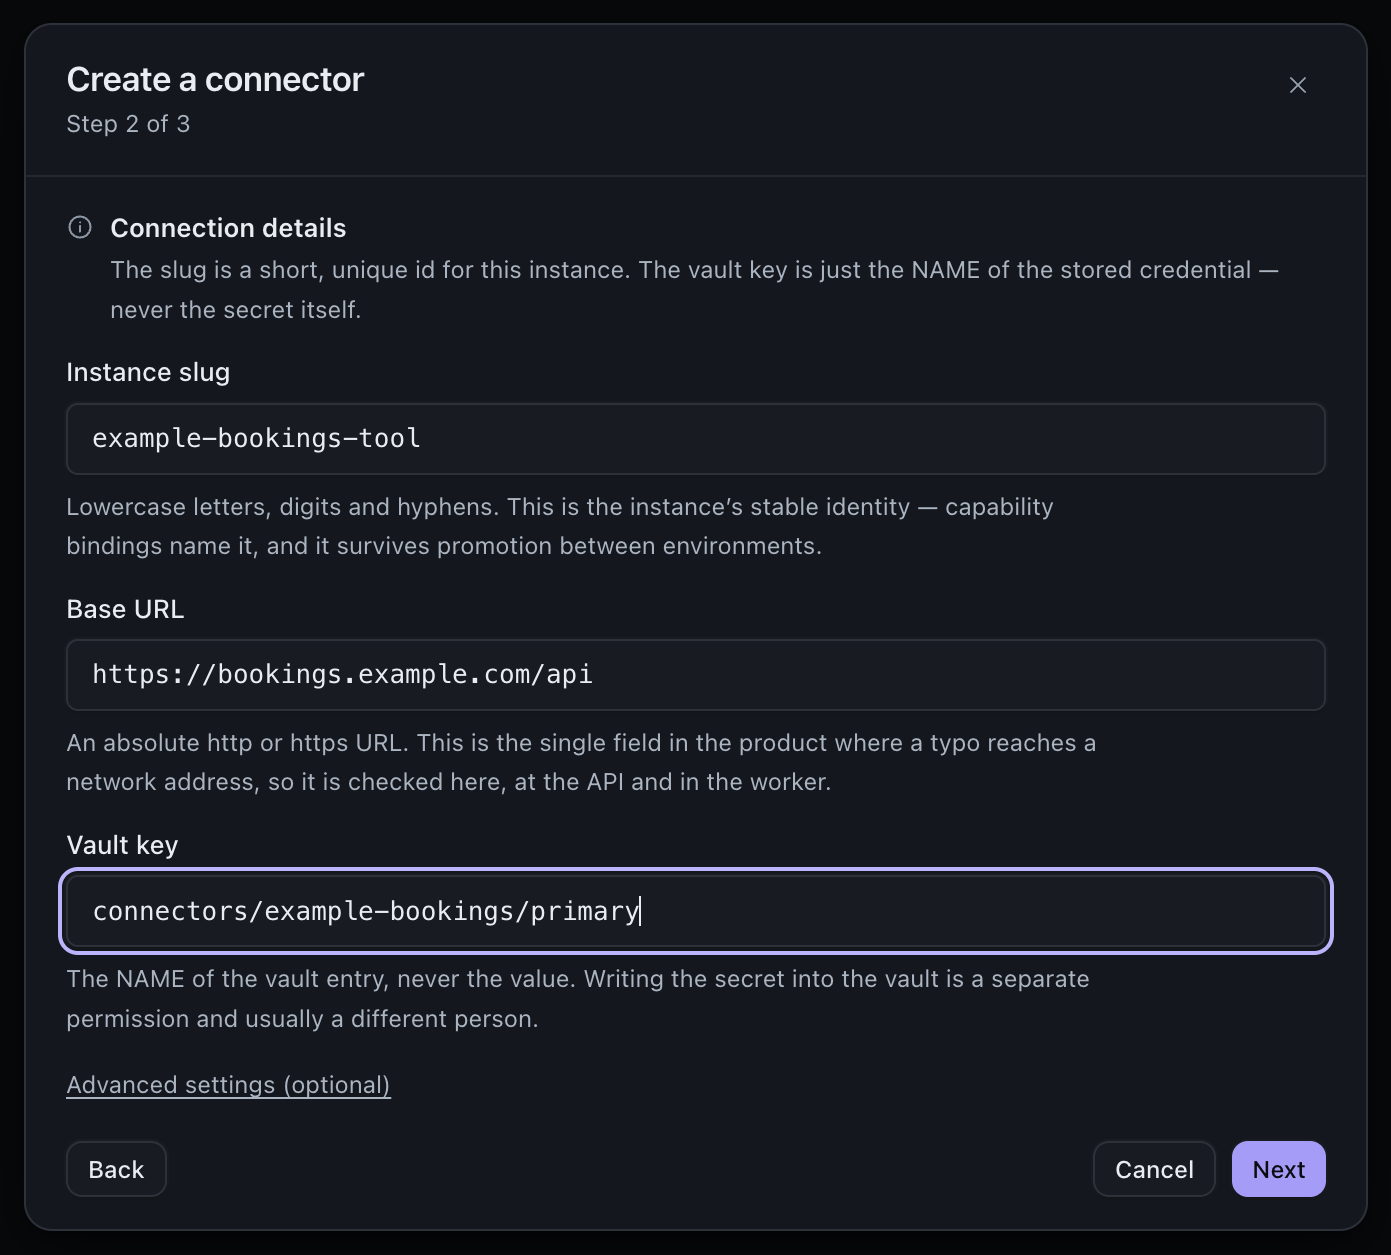
Step 2 of the wizard, filled with example values. Nothing was saved.
What you should see. The new instance appears in the Connectors list marked Draft and Mock. That is correct and safe. A new instance can not call anything, by design.
If you do not see your kind of system in step 1. The platform lists only the systems it already has a definition for. A new kind of system needs a definition written by the Kav team, because a definition is code, not a form. Ask us. Do not try to work around it.
Switching it on, on purpose
Open your instance. The Lifecycle panel has two separate choices.
- Status: Draft, Active or Suspended. Only an Active instance can make a call at all.
- Mode: Mock answers from saved sample answers. Record calls your tool and saves what it says. Live calls your tool for real.
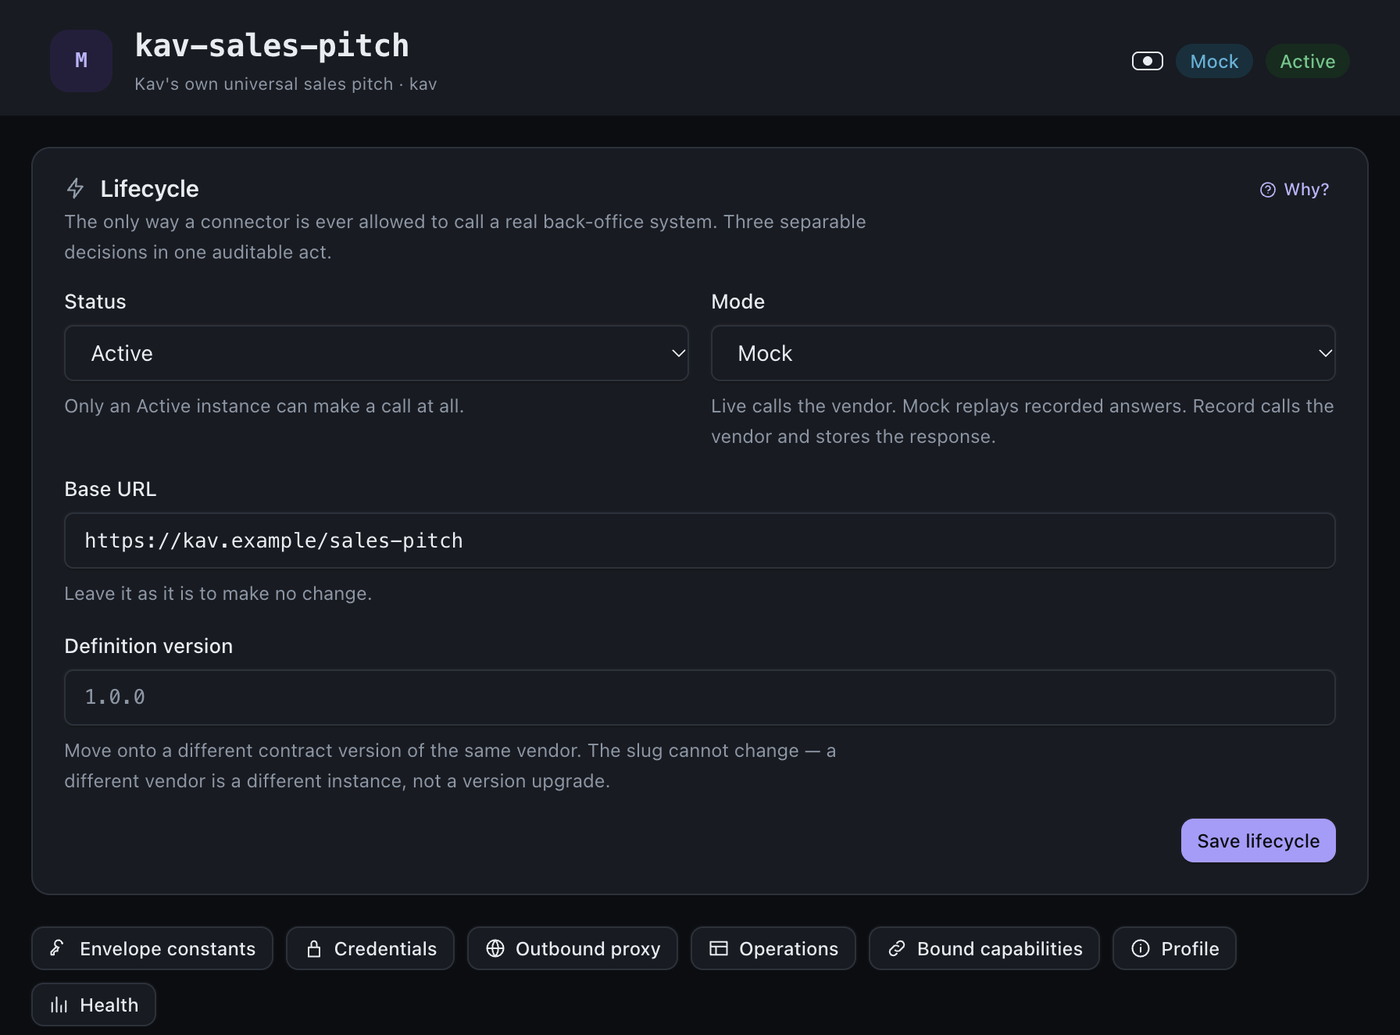
The Lifecycle panel. Going live means Active and a mode that is not Mock.
Going live is Active plus a mode that is not Mock. The Studio refuses that combination if it finds no credential stored for the instance. Every change is saved as an act with a name and a time on it, in the audit record.
There is no "Test connection" button in the Studio today. The safe way to test is to leave the instance in Mock, check the whole path, and only then move to Live. After that, the Health button on the instance shows whether calls are succeeding, how slow they are and whether the connector has paused itself after too many errors.
The password, and why you never see it again
Open Credentials on the instance. You will see three facts: the vault key name, where it is stored, and a fingerprint with a last-used time. A fingerprint is a short code that proves which secret is stored, without showing it.
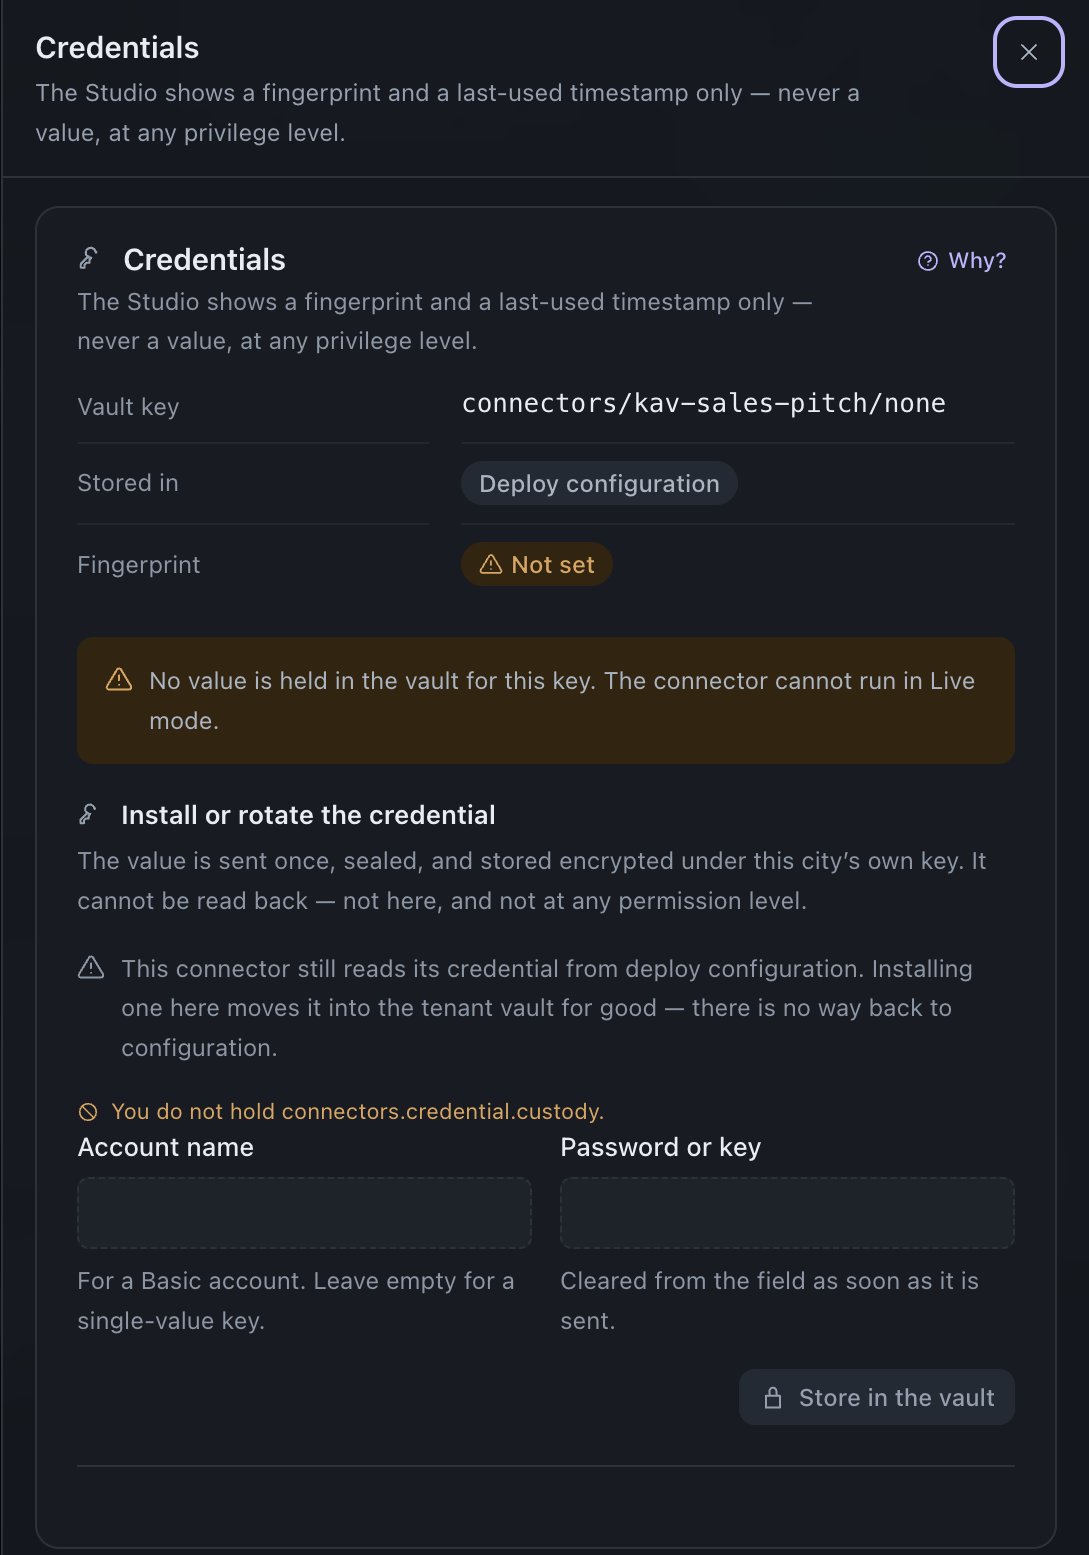
The Credentials drawer. Here the fingerprint says Not set, and this account may not store a value.
To put the secret in, a city administrator opens this drawer and uses Install or rotate the credential. The value is sent once, sealed, and stored encrypted under your organization's own key. Nobody can read it back, at any level. Rotating it later just shows you a new fingerprint.
What you should see. A fingerprint and a "last used" time after the administrator stores the value. Not set means nothing is stored yet, and the instance can not run Live.
If it does not work. If the instance refuses to go Live, open Credentials first. Most often the fingerprint says Not set. Read more in Referencing a credential you never see again and A connector's lifecycle.
Step 2. The capability: one small job the assistant can do
A capability is a named job with a clear input and a clear output. It has three parts, called faces. Only the third is yours.
- What it means (the wording the assistant reads). Identical for every organization.
- The contract (what goes in, what comes out). Identical for every organization.
- How it reaches your tool (which connector, which operation). This part is per organization.
Open Modules and capabilities, pick a capability, and you will see five tabs: Semantic, Contract, Execution, Policy and Compiled tool.
Face 1, what it means
The Semantic tab shows the summary and two short notes: Use when and Do not use when. This is what the assistant reads to decide if this is the right job.
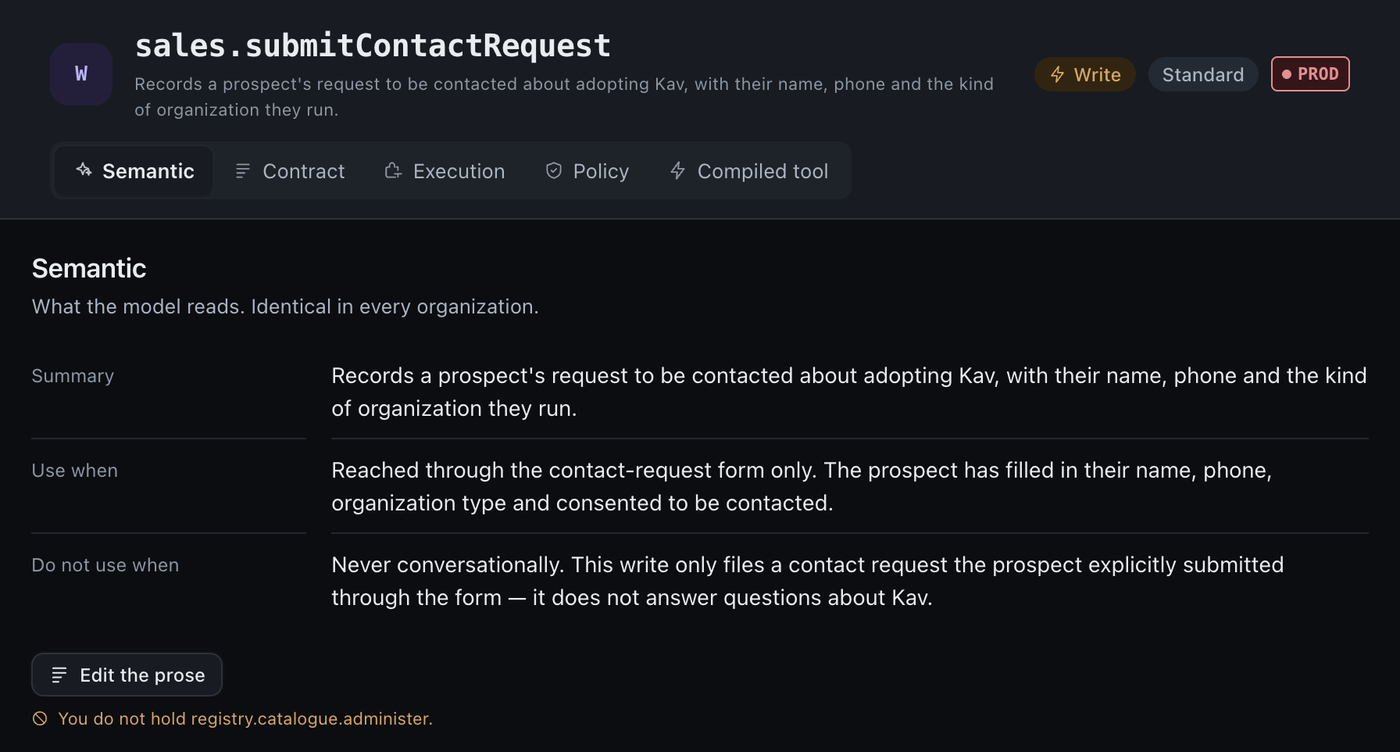
The Semantic tab. Editing this wording is a Kav team permission.
You can read this tab, but changing the wording needs a permission only the Kav team holds. That is on purpose: the meaning of a capability is the same in every city, so one change would reach all of them.
Face 2, the contract
The Contract tab shows what the person must give (the input) and what comes back (the output). It is a strict list of fields with types and short descriptions.
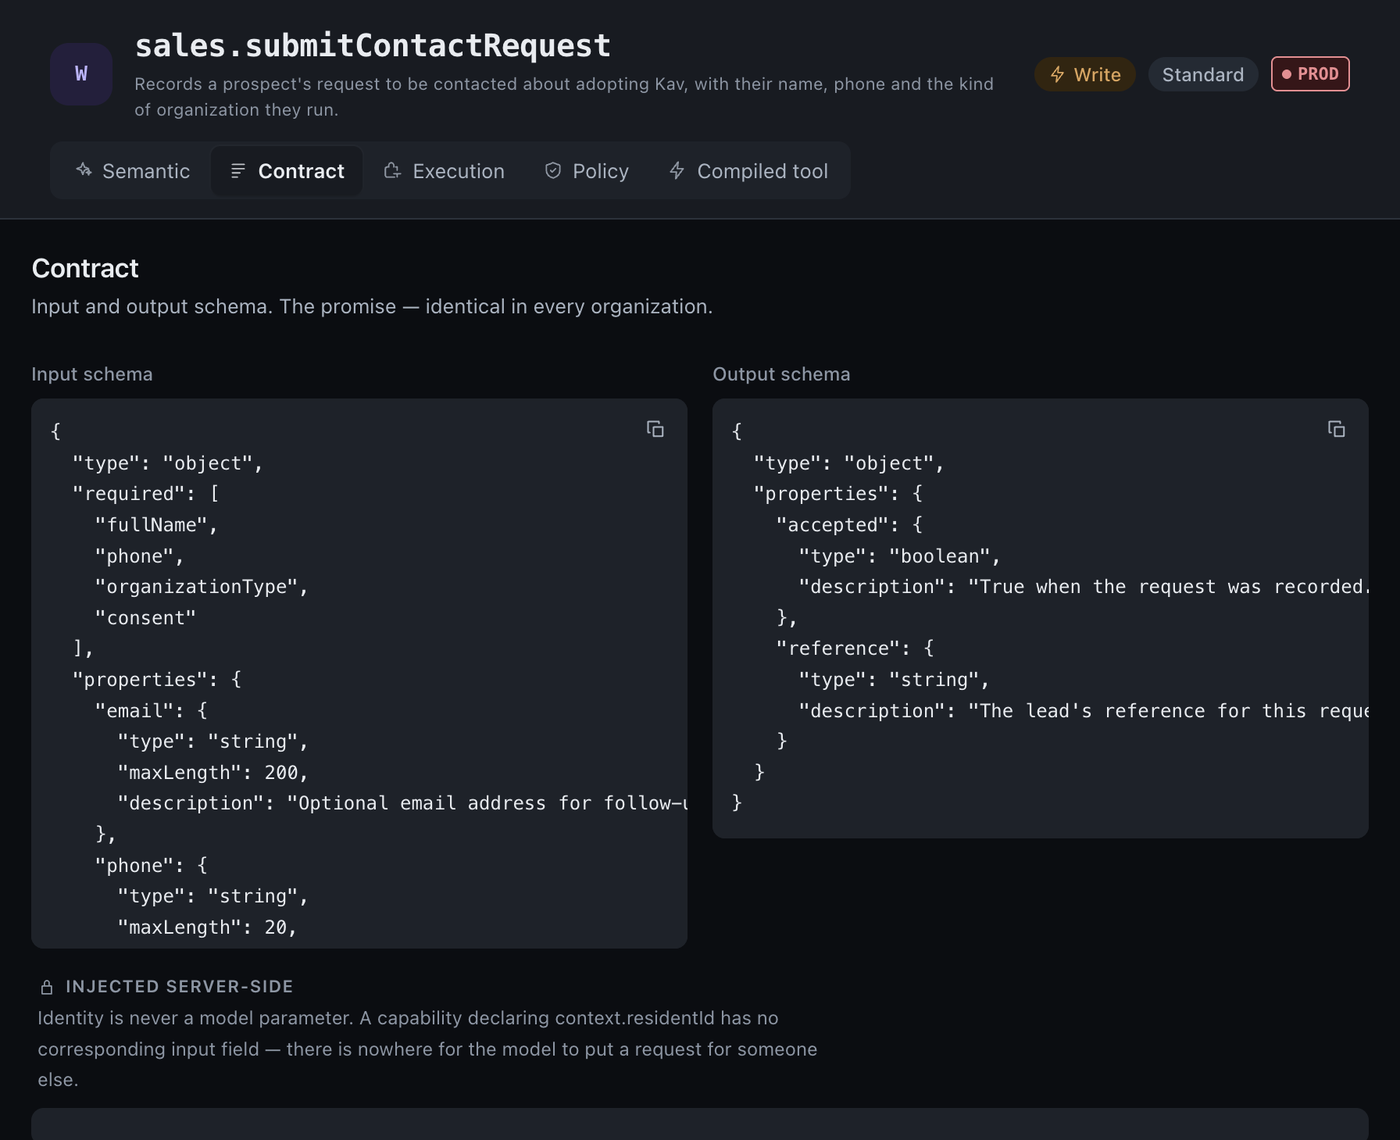
The Contract tab. The note at the bottom is a promise: identity is never a field the model fills in.
Notice the note at the bottom: identity is injected server-side. If a capability needs to know who is asking, that comes from the sign-in. There is no input field for it, so nobody can ask about someone else by typing a different id.
Once a capability is published, its contract is frozen. Everything else in your Studio, such as flows, rules and prompts, is written against that exact shape, and moving it would break them all at once.
Face 3, how it reaches your tool
This is your part. Open the Execution tab and press Edit binding (or Create binding if there is none). A binding pairs one capability with one operation on one of your connector instances.
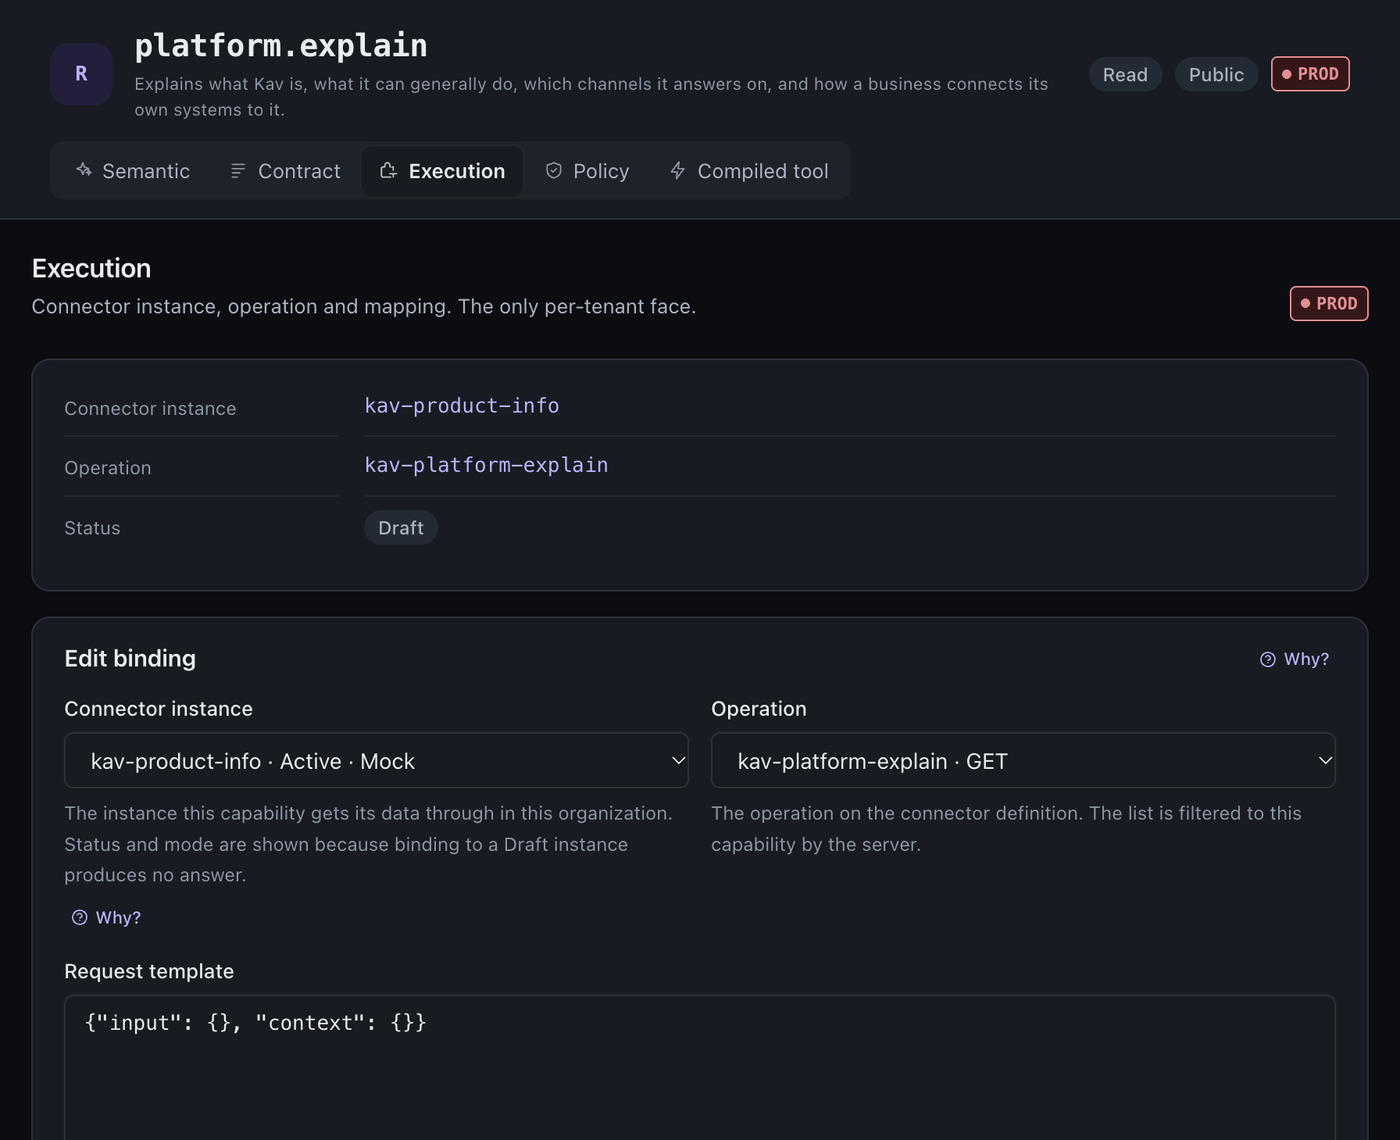
The Execution tab and the binding form. The binding here is a Draft.
- Connector instance. Pick yours. The list shows its status and mode, because binding to a Draft instance produces no answer.
- Operation. One named call your tool offers, such as a GET on a path. The list only shows operations that fit this capability.
- Request template. A small JSON note that says which of your tool's fields to fill from the input. Write
{{ input.fieldName }}for something the person supplied. - Response mapping. The other direction: a JSON note that says where in your tool's answer each output field lives, for example
"balance": "data.balanceDue". - Fields this vendor cannot supply. If your tool simply does not have a field, say so here. That sentence is added to what the assistant reads, so it will not pretend. The server refuses a binding that leaves a required field empty.
- Publish immediately. Leave this unchecked while you are still building. Unchecked, the binding is saved as a draft and the assistant never reaches a draft.
What you should see. The Execution tab now shows your instance, your operation and a status. In the capability list the label changes from Unbound to Bound.
If it does not work. Read the red message on the form. The two common causes are a binding pointed at an instance that is still Draft, and a response mapping that names a field your tool does not return.
Read or write, and the confirmation step
Open the Policy tab. It tells you how careful the assistant must be.
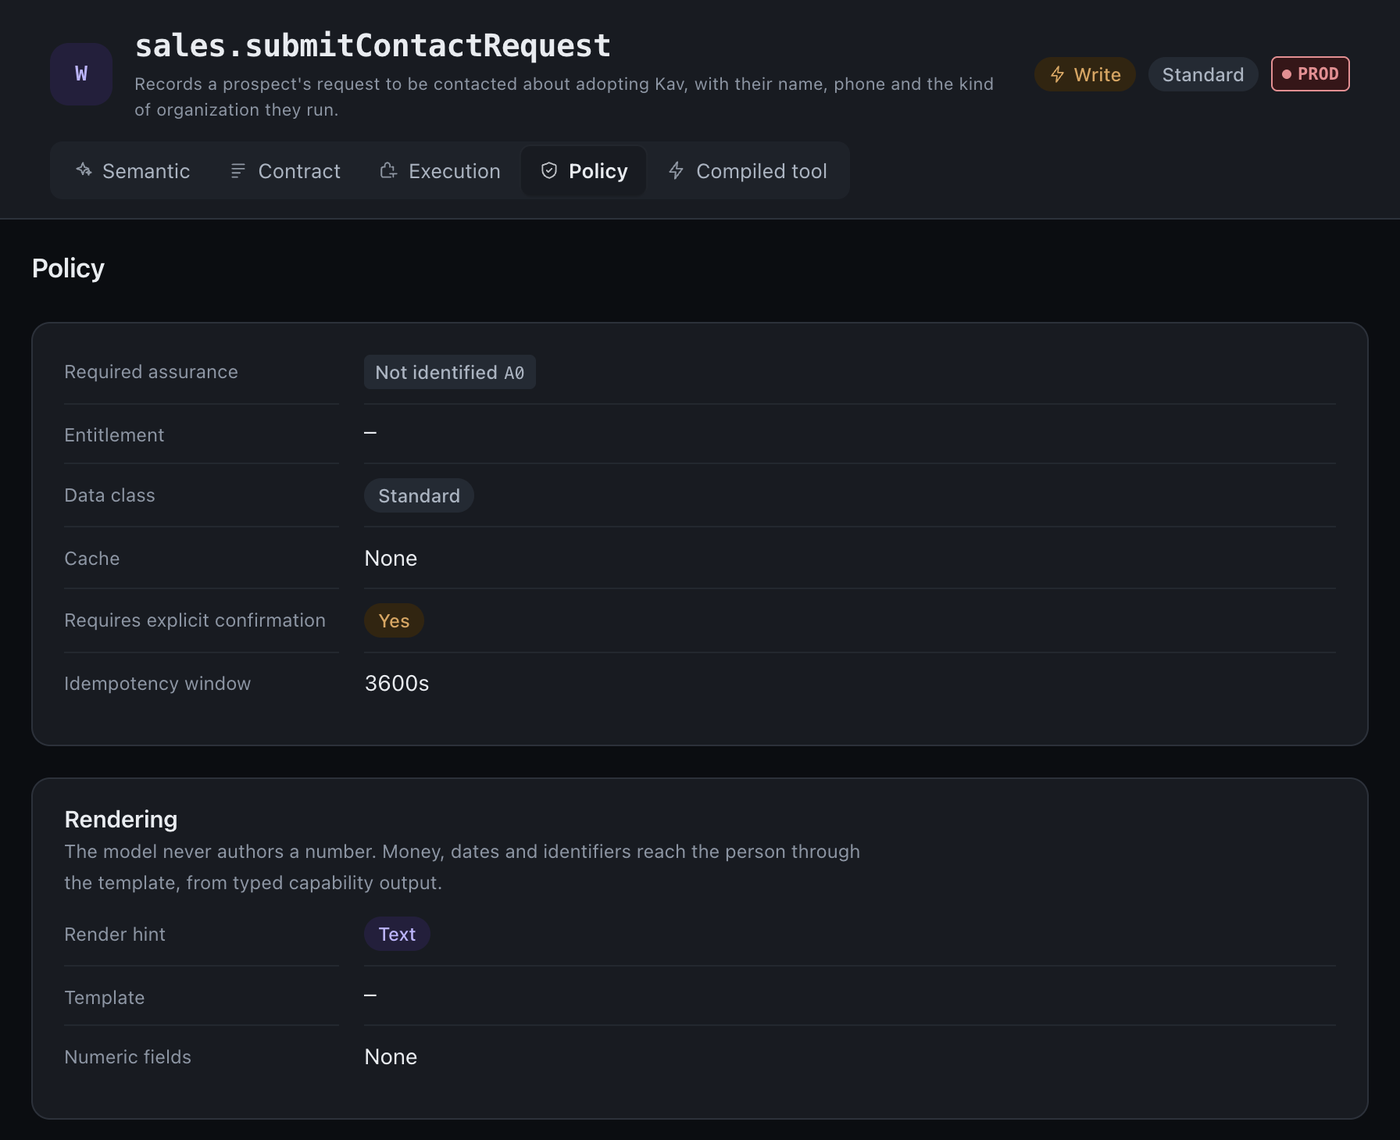
The Policy tab of a write capability. Confirmation is on, and it is not a switch you can turn off.
- Required assurance says how sure we must be of who the person is, from A0 (anyone) to A4. A binding may raise it, never lower it.
- Read capabilities only look things up.
- Write capabilities change something. They always need an explicit confirmation turn ("Do you want me to book this?"), and they carry an idempotency window, which is a timer that stops the same request from being done twice by accident.
- The Rendering box is where numbers stay honest. The model does not write the number. The template prints it from your data, and a number the model types into its own sentence is stripped out before the person sees it.
Read more in The three faces of a capability, Choosing a render hint and The AI module, explained field by field.
Preview it the way the assistant sees it
The Compiled tool tab shows exactly what the assistant is handed for your organization. Check it after every change.
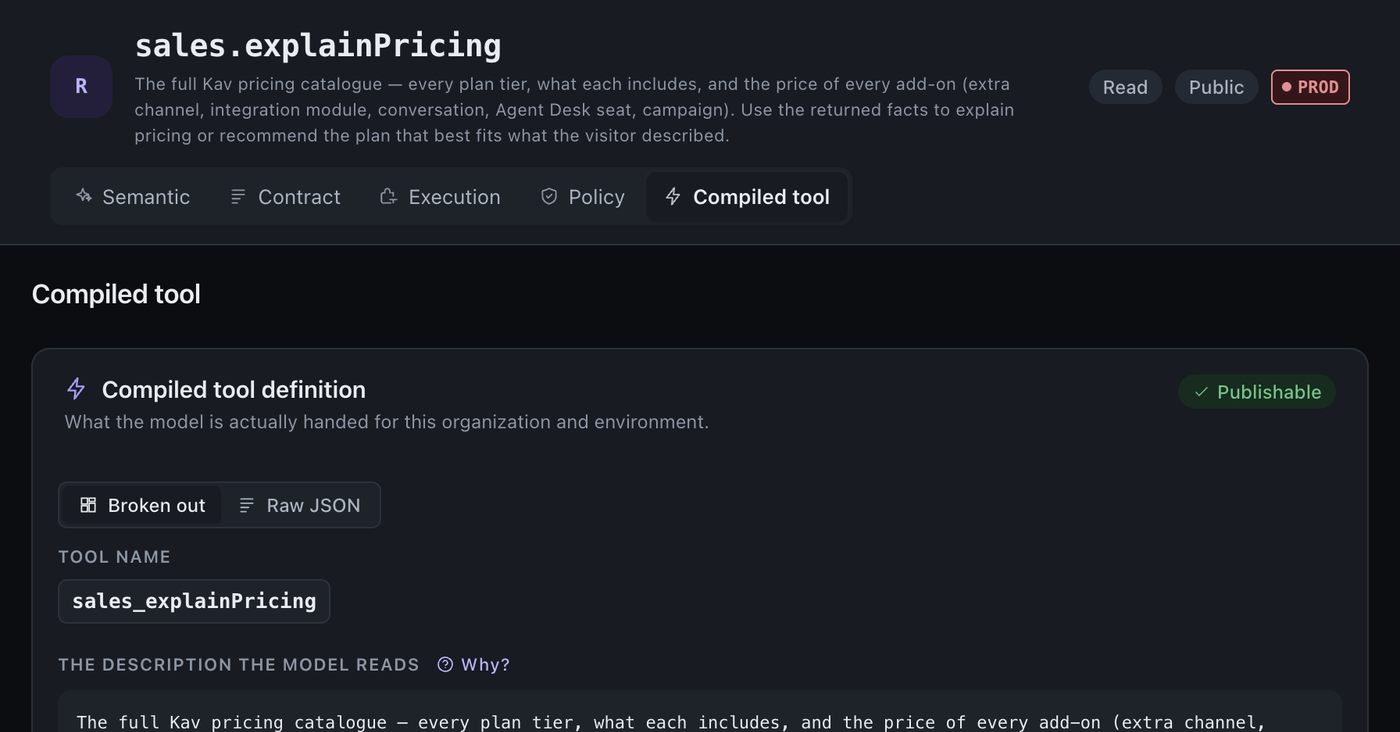
The Compiled tool tab. The badge says whether this tool can be published.
What you should see. A green Publishable badge. If it shows an error instead, nothing was written, and the message names the field to fix. See Previewing a capability the way the model sees it.
Step 3. Rules: decisions the AI must not guess
Some answers must never be left to an AI: who is eligible for a discount, who gets which price, where a request goes. For those you write a rule. A rule answers one named question, such as "is this person eligible for a discount?", from facts like age or place of residence.
- Open Rules in the left menu and pick a decision point (a named question). Each one is a table.
- In the Table view, each row is one rule. Fill in the conditions and the decision. An empty cell means any.
- If two rows could both apply, set their order. You decide which one wins.
- Look at the Declared fallback. It is the answer when no row matches.
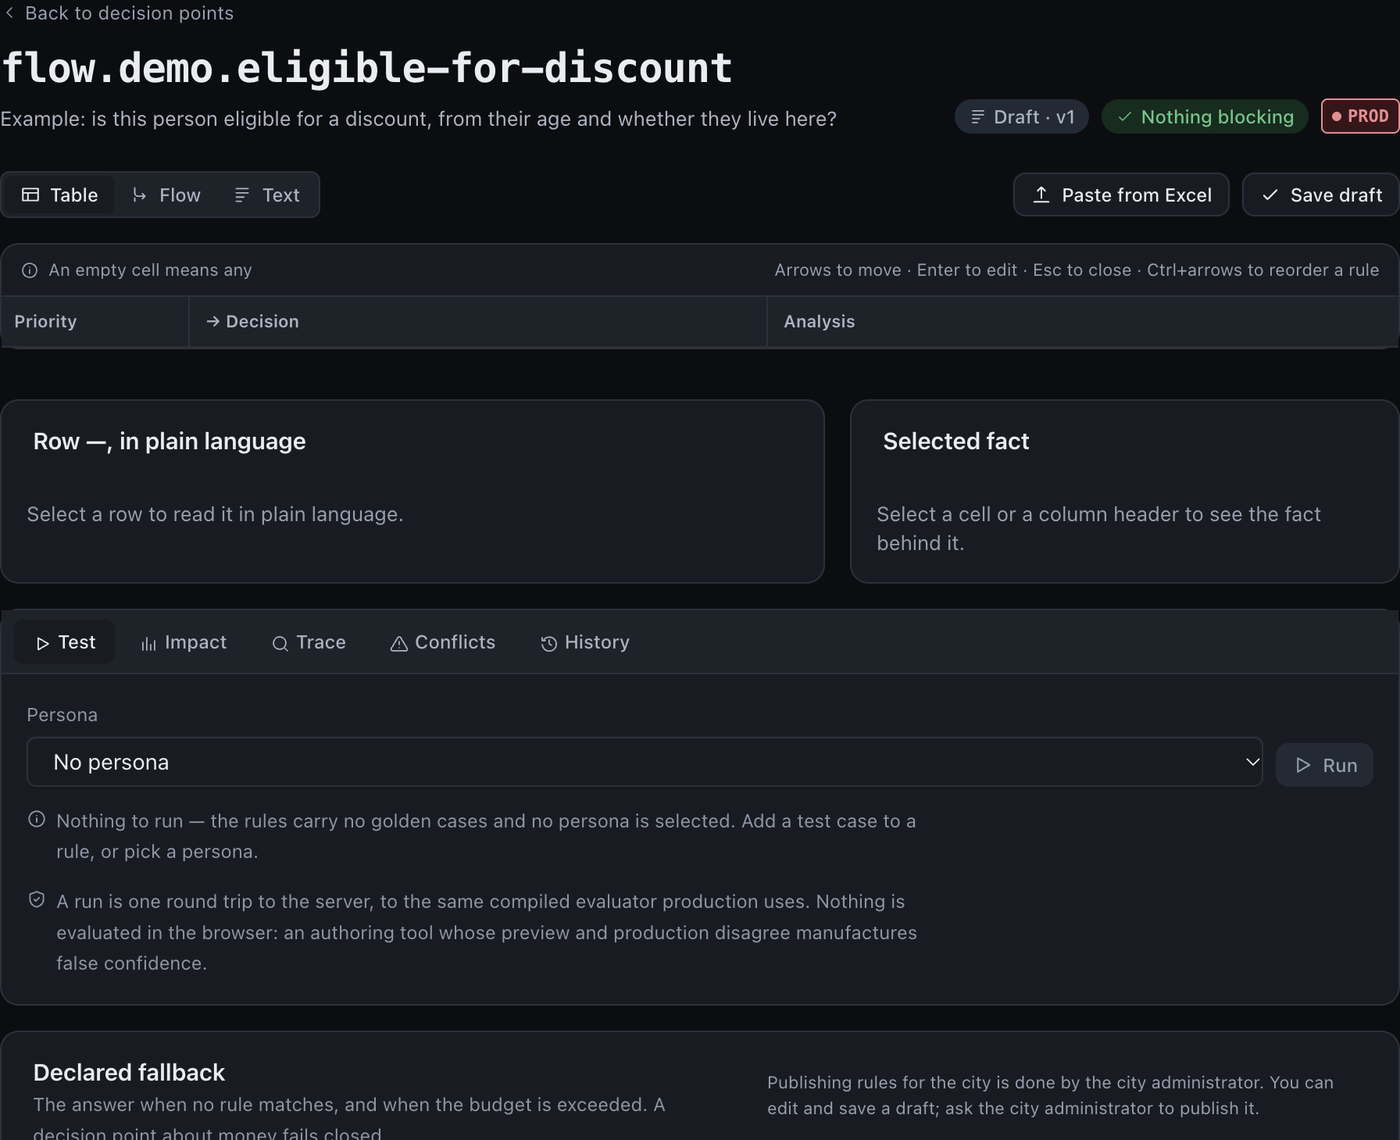
A rule screen for an example question, still empty. The note at the bottom right says who publishes.
Two things to know.
- A rule that cannot be worked out does not match. If a fact is missing or unclear, the rule says no. It never guesses "yes". Money questions fail closed too.
- A rule returns a decision. It never does anything by itself. The platform applies the decision afterwards, so consent, quiet hours and the audit record all still apply.
To check your work, use the Test tab with a sample person, then Impact to see what would change, and Conflicts to see rows that hide each other. A run goes to the same engine that production uses, so the preview is the truth.
Who publishes. You (as an integration engineer) can save a draft. Publishing a rule for the city is done by the city administrator. That gives every decision a maker and a checker. Publishing is also blocked until analysis errors, failing tests, an uncovered case with no default, and a missing reason are all cleared. Read Your first eligibility rule and Testing a rule before you publish it.
Step 4. The assistant and its settings
You now have a connector, a bound capability and maybe a rule. Three more things decide how the assistant behaves.
Which capabilities it may use. A capability belongs to a module, and a module has to be installed for your organization. Open Install a module to add one. It is added switched off, pinned to the newest published version. The assistant can only use a capability that is installed, enabled and bound. Switching a capability on for the assistant is a step our team does with you, so if a bound capability does not seem to work, ask the Kav team.
Answer policy. Under city settings, Answer policy controls how sure the assistant must be before it answers from your knowledge. Every row shows the value in use and whether it came from the platform or from you. Lowering the confidence floor means answers on thinner evidence, so the Studio asks you to confirm it in words. See Setting your answer policy.
Assistant model and spend ceiling. Under city settings, Assistant model is where your organization registers its model provider. You again give the name of a vault entry, never a key. You choose a cheap model for simple steps and a strong model for tool use and hard questions, and the platform escalates from one to the other by confidence. A hard ceiling caps spend, and Spend against the ceiling shows the number filling up. See Model tiers and spend ceilings.
These three screens need the organization-settings permission. An integration engineer who opens them sees "This screen is closed to you" and the name of the permission. That is the system working, not a fault.
Where the numbers come from. Back on the capability's Policy tab, the Rendering box holds the render hint (Text, Card list, Table, Detail or Confirmation) and the numeric fields. That is how an amount, a date or a reference number reaches the resident from your data and not from the model's imagination.
Step 5. Test it, then publish it
Work in this order. Do not skip a stage.
- Mock first. With the connector Active and Mock, run a real question through the assistant and check the answer. No real system is touched.
- Check the compiled tool. It should say Publishable.
- Test the rule with a sample person, and read the Impact tab.
- Try a whole conversation. If the capability sits inside a flow, walk it in the simulator. See Testing a flow with the simulator.
- Go Live. Have the credential stored (fingerprint present), then set the connector to Active and Live. Then publish the binding, or bind it with Publish immediately checked.
- Have the rule published by the city administrator.
- Look again in Live. Ask one real question and check the Health panel on the connector.
Draft and published, in plain words
A draft is your working copy. The assistant never reaches it. Published is what your residents get. Saving a draft is always allowed and can be unfinished. Publishing is the moment that counts, and it has gates.
There is no one-click undo that we can promise. If something goes wrong, fix it forward: set the connector back to Mock or Suspended to stop real calls at once, correct the draft, and publish again.
Dev, test and prod
The chip at the top of the Studio shows which environment you are in: dev, test or prod. Build and test in dev or test, then move the work to prod with Promotion.
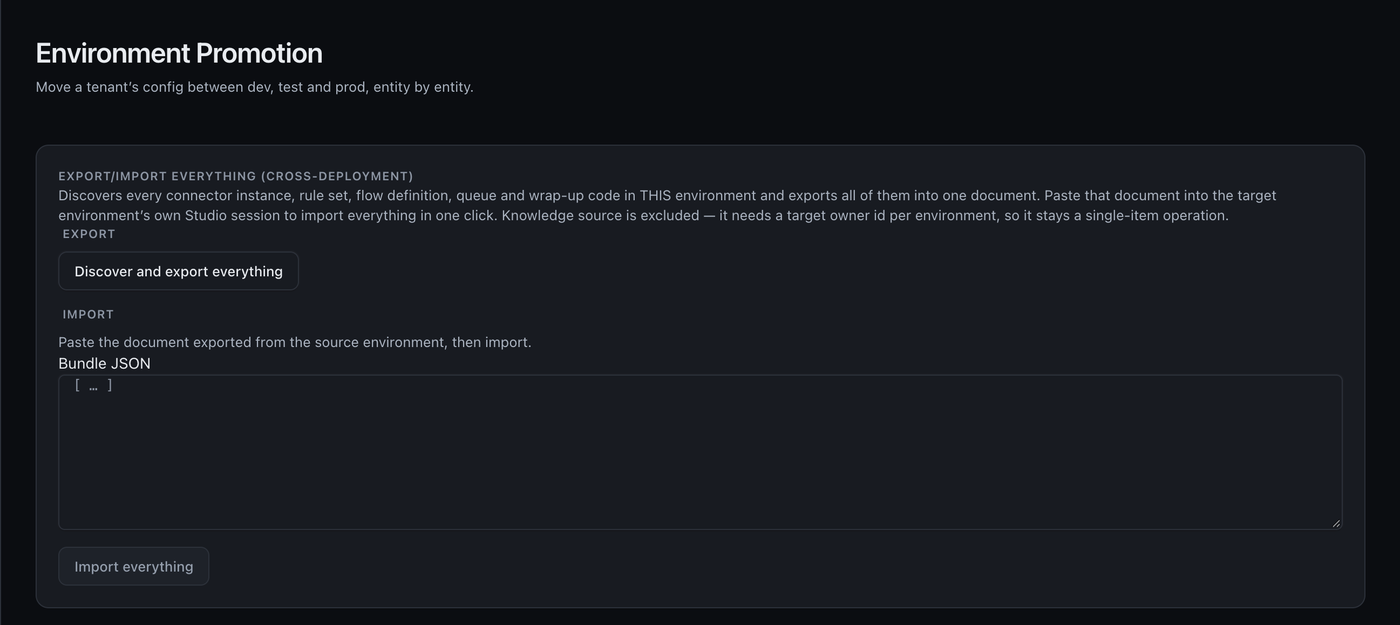
Environment Promotion. Export from one environment, paste into the next.
Discover and export everything collects your connector instances, rule sets, flows, queues and wrap-up codes into one document. You paste that into the other environment's Studio and import it. Bindings are not in that list, so check them in the target environment after you import.
Where to see who did what
Every change to a connector's lifecycle is an act with a person and a time on it, kept in the audit record. Reading it is itself recorded: you are asked for a purpose first. See Reading the audit log.
Which plan does this need?
The Studio has no plan switch. It does not check whether you are on Starter, Plus or Pro before it lets you open the connector screens, bind a capability or write a rule. What it checks is your role, as shown in the table near the top of this guide.
Three limits are worth knowing.
- Systems the platform already knows. You can add and configure a connector for any kind of system that already has a definition, yourself, in the Studio. A brand new kind of system needs a definition and a capability written by the Kav team.
- Module packs and licence bundles. Some module packs need a licence bundle to be granted before they can be installed. Only the Kav team grants them. See Granting a licence bundle.
- Roles. Storing credentials, publishing rules and the assistant settings sit with the city administrator. Make sure that person exists before you start.
Checklist
- I know which system I am connecting and who will store its password.
- The connector instance exists, is Active and is in Mock mode.
- The city administrator has stored the credential, and the fingerprint shows.
- The capability is bound to my connector and operation, saved as a draft.
- The Compiled tool tab says Publishable.
- Any rule is written, tested and published by the city administrator.
- The assistant model and spend ceiling are set.
- I tested in Mock, then set the connector to Live and asked one real question.
- The binding is published, and the Health panel looks healthy.
- I know where to see the audit record.